Uploading source data
Uploading a file from your local computer to Kernel Planckster is not too difficult, and we'll outline the steps to accomplish that below. Experimenting with this can be a great way to familiarize yourself with the process a file undergoes to become part of a Research Context from any other source (e.g. a social media scraper).
We're going to demonstrate this process with a minimum of code, primarily relying on the Swagger interface we've set up for you. So if you aren't already familiar with using Swagger, we recommend you take a moment to read through the guide we've prepared for you.
At the end, we'll also walk you through registering the file with Kernel Planckster - an necessary step for the Kernel to recognize and retrieve the file later!
Steps to Upload a File
1. Navigate to the Swagger interface
You should now see the page with FastAPI in the corner, and a list of all the available endpoints.
2. Use the GET /client/{id}/upload-credentials endpoint to get a URL that can receive your file
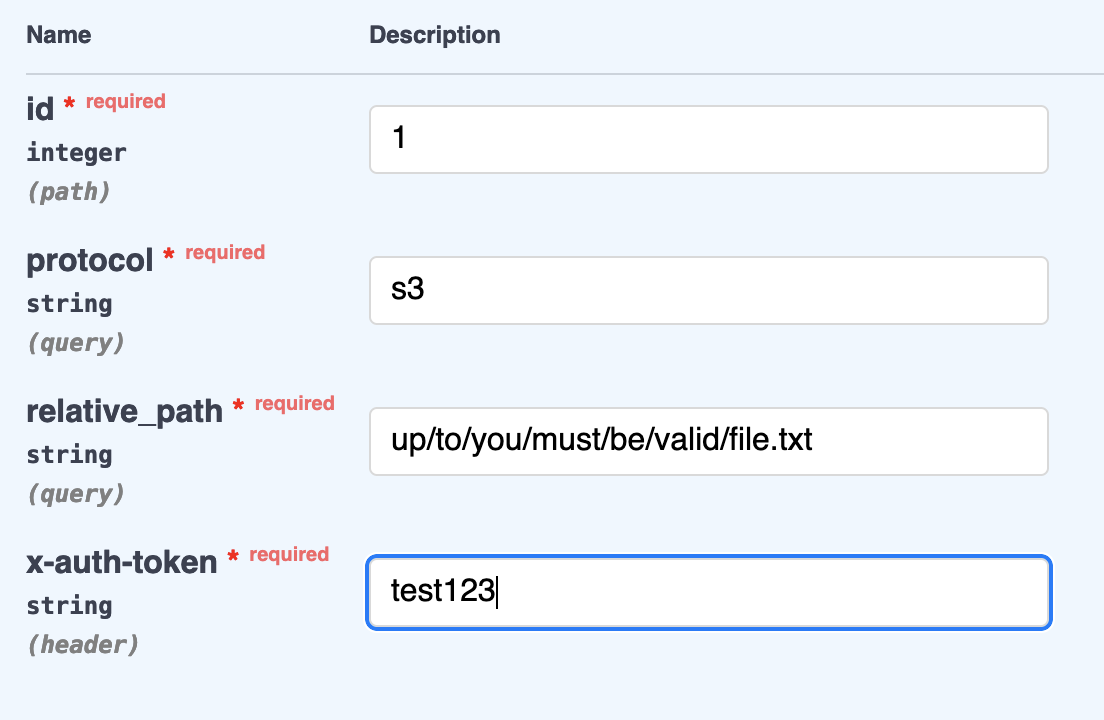
For security reasons, files must be uploaded to a signed URL. To generate the signed URL for this file upload, click the Try it out button and fill out the following fields (also shown in the screen shot below):
- id: Your ID is
1! - protocol: For the time being, this is always going to be
s3. - relative_path: This is up to you, and doesn't need to reflect the location or name of the file on your local machine. The file name and extension must be valid, however, and we strongly recommend using consistent naming conventions with your file name and path. See the screen shot for an example.
- x-auth-token: For testing purposes, use
test123.

Click the Execute button, and you should see a response with "status": true similar to this:
{
  "status": true,
  "code": 200,
  "errorCode": null,
  "errorMessage": null,
  "errorName": null,
  "errorType": null,
  "signed_url": "http://localhost:9001/sda/up/to/you/must/be/valid/file.txt?X-Amz-Algorithm=AWS4-HMAC-SHA256&X-Amz-Credential=minio%2F20240927%2Fus-east-1%2Fs3%2Faws4_request&X-Amz-Date=20240927T162413Z&X-Amz-Expires=3600&X-Amz-SignedHeaders=host&X-Amz-Signature=f7d94c2eb96ecfd456dce55e025ae8b8c653e7c564f28e24fb35616d66959657"
}
Go ahead and copy the URL next to "signed_url" (without the quotes) and store it somewhere you can retrieve it easily! You'll need this when uploading your file. You should also store the relative_path you used above, as you'll need it below, when registering the file.
3. Upload a local file to the signed URL
In this step, you'll choose a file on your local computer to actually upload to Kernel Planckster, using the signed URL you got from the previous step. This step will require a bit of code, but we've put together some Python you can use without too much effort.
File uploads require encoding for servers to understand what they're receiving. The following Python code handles that, as well as allowing you to provide the file and the signed URL where you're sending it. Go ahead and copy/paste it to whatever location you like on your computer!
#!/usr/bin/env python3

import requests
import argparse

def upload_file(file_path, signed_url):
    try:
        print(f'Uploading file {file_path} to signed url')

        with open(file_path, 'rb') as file:

            # This is the line that does the thing! Everything else is to handle errors.
            response = requests.put(signed_url, data=file)

        if response.status_code != 200:
            print(f'Failed to upload file. Server responded with status code: {response.status_code}')
        else:
            print(f'File {file_path} uploaded to signed url')
            print(f"Minio Response: {response.json()}")

    except Exception as e:
        print(f'An error occurred: {e}')


def main():

    # Set up the arguments that allow you to choose a file and provide the signed URL
    parser = argparse.ArgumentParser(description='Upload file to minio server')

    parser.add_argument('--file-path', dest='file_path', type=str, help='Path to file to upload', required=True)

    parser.add_argument('--signed-url', dest='signed_url', type=str, help='Signed url to upload file to', required=True)

    args = parser.parse_args()

    file_path = f"{args.file_path}"
    signed_url = f"{args.signed_url}"

    upload_file(file_path, signed_url)

if __name__ == '__main__':
    main()
Once you have this file on your computer, you can use your terminal to run it, providing the local path to the file you want to upload, as well as the signed url.
The relative_path you provide in Step 1 does not need to include the same file name or even the same extension as the local file you use. That being said, it's definitely best practice to keep at least the extension the same!
cd directory/with/python/code #navigate to the folder where you pasted the Python code above
python kernel_upload_helper.py \
--file-path path/and/filename.extension \ #use quotes if there are spaces!
--signed-url "http://replace-with/signed/url/from/above"
In this example, we'd use http://localhost:9001/sda/up/to/you/must/be/valid/file.txt?X-Amz-Algorithm=AWS4-HMAC-SHA256&X-Amz-Credential=minio%2F20240927%2Fus-east-1%2Fs3%2Faws4_request&X-Amz-Date=20240927T162413Z&X-Amz-Expires=3600&X-Amz-SignedHeaders=host&X-Amz-Signature=f7d94c2eb96ecfd456dce55e025ae8b8c653e7c564f28e24fb35616d66959657 as the URL.
The python command will run the Python code, and send the file we specify to the signed URL. You should see the following in your terminal window - you can ignore if you see an Expecting value: error!
Uploading file path/and/filename.extension
File path/and/filename.extension uploaded to signed url
An error occurred: Expecting value: line 1 column 1 (char 0)
That's it! You've successfully uploaded a file! But now it's essential that you register that file, so that Kernel can identify it and retrieve it whenever it's needed.
Steps to Register an Uploaded File�
Kernel Planckster has its own tracking mechanism for uploaded files, which is necessary in sending the files where they need to go (e.g. to OpenAI to inform a research context). The good news is that this process is even quicker than uploading!
1. Navigate to the Swagger interface
You should now see the page with FastAPI in the corner, and a list of all the available endpoints.
2. Use the POST /client/{id}/source endpoint to register the file
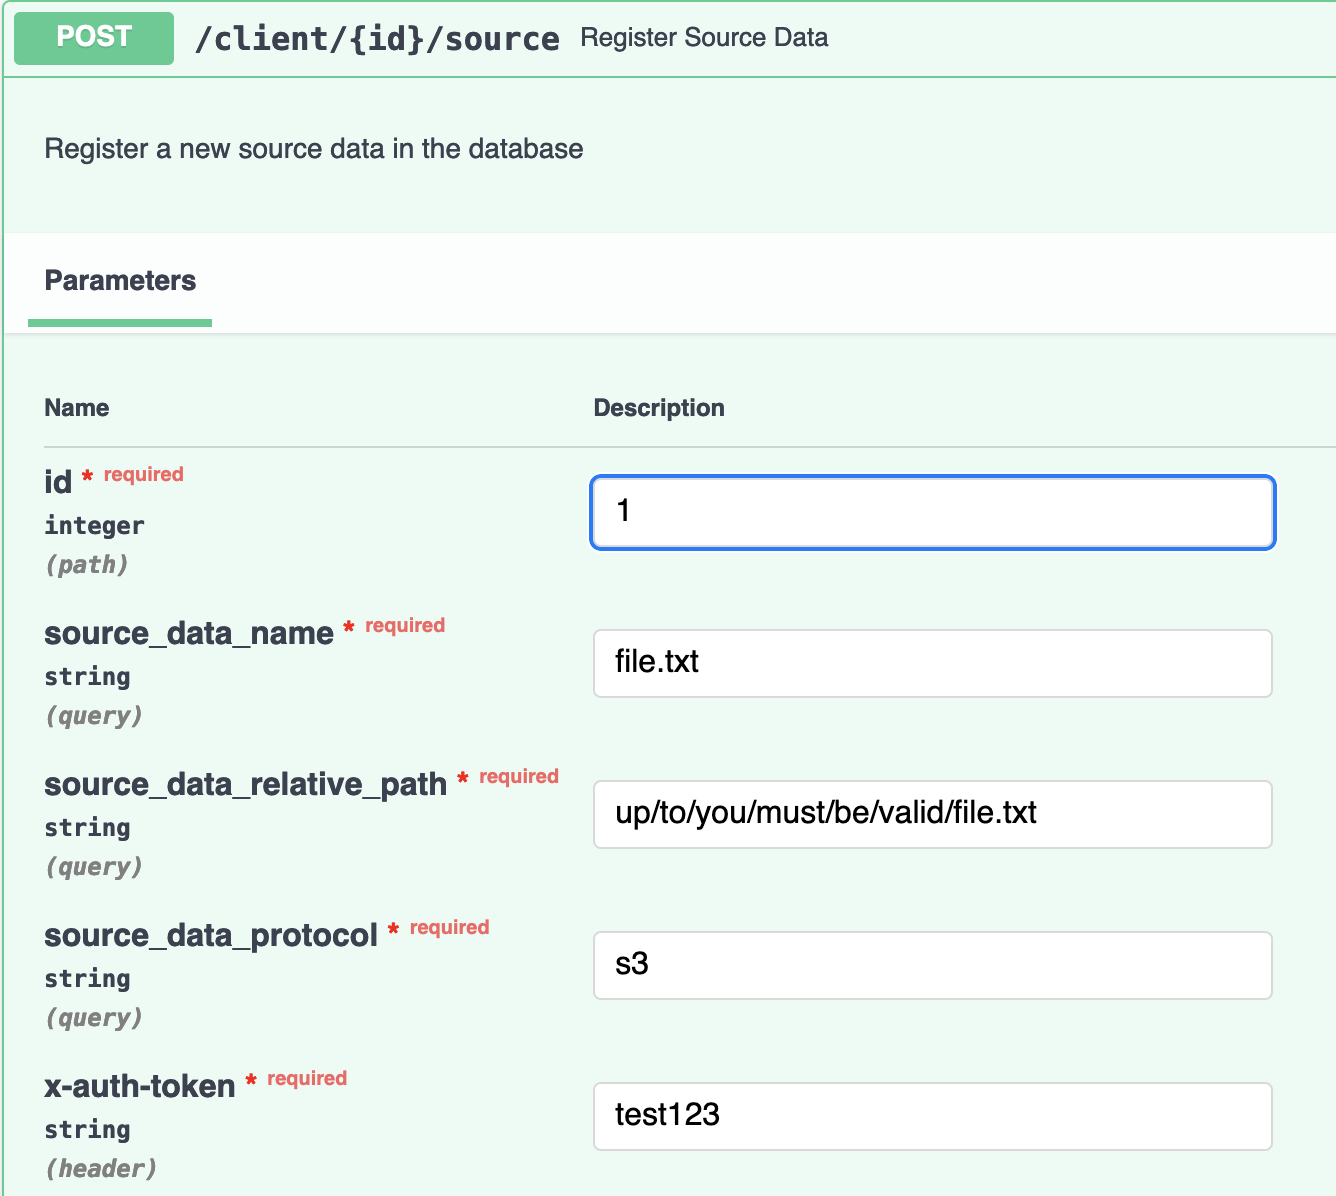
In this step, you send critical information to Kernel Planckster about how to find the file. Click the Try it out button, and fill out the following fields (also shown in the screen shot below):
- id: Your ID is
1! - source_data_name: This is the name the file will take once it's downloaded or sent anywhere. The file name and extension don't need to match what you have in
source_data_relative_path, but they must be valid and we strongly recommend using consistent naming conventions with your file name and path. - source_data_relative_path: This is the key piece of information we're sending to Kernel Planckster to find the file. This must precisely match the
relative_pathprovided when uploading the file. - source_data_protocol: For the time being, this is always going to be
s3. - x-auth-token: For testing purposes, use
test123.

Click the Execute button, and you should see a response with "status": true similar to this:
{
  "status": true,
  "code": 200,
  "errorCode": null,
  "errorMessage": null,
  "errorName": null,
  "errorType": null,
  "source_data": {
    "created_at": "2024-09-27T16:33:56.230367",
    "updated_at": "2024-09-27T16:33:56.230373",
    "deleted": false,
    "deleted_at": null,
    "id": 1,
    "name": "my_file.json",
    "relative_path": "up/to/you/must/be/valid/file.txt",
    "type": "txt",
    "protocol": "s3",
    "status": "available"
  }
}
If so, then congratulations! You've uploaded and registered a file!
The next guide will show you how to download that same file, the first step of which will confirm that your file is really and truly uploaded.